Wix Upload an Image to an S3 Bucket
How to create a static website for a low cost with Amazon AWS S3
There are many ways build your own website. While services similar Wix and Squarespace are mutual solutions, they're usually not the virtually toll effective..
To give you an idea of website pricing, Millennial Moderator costs effectually USD $0.threescore/month, with a $12/yr domain registration fee (standard beyond any website builder service). Comparatively, services like Squarespace and Wix can cost anywhere from $12 to $twoscore each month, plus the same $12/year domain registration fee (you tin can get a domain from a agglomeration of unlike sites, for example GoDaddy.com). That high of spend might be a dealbreaker, peculiarly if your business is not all the same assisting. Not simply that, but website builders oft remove customization options, so yous're essentially paying more for less control over your website. So how exactly are nosotros able to operate Millennial Moderator for such a depression cost?
We've created Millennial Moderator using Amazon Web Services. They offer various cloud computing tools including EC2, S3, Road 53 and many more than. Today, I'm going to show y'all how y'all can create a static website for a depression cost with Amazon AWS S3.
1. Create an Amazon Web Services (AWS) account
To get started, you showtime demand to have an agile AWS account. If you already accept one, you tin can skip to step 2. AWS accounts are free to open, and yous're simply charged for on-demand usage of services. Each service is charged at unlike rates simply, to give yous a general idea, the EC2 service charges are equally low as $0.02 per hour (we won't be using this). To open a new AWS account, follow the registration steps here. You lot volition accept to enter some personal information including your telephone number and a valid payment method.
- Annotation: When you open a new AWS account, you will encounter a $1.00 belongings accuse on your card. Don't worry, this is just a temporary concord to validate your payment method and volition exist removed from your statement within a few days.
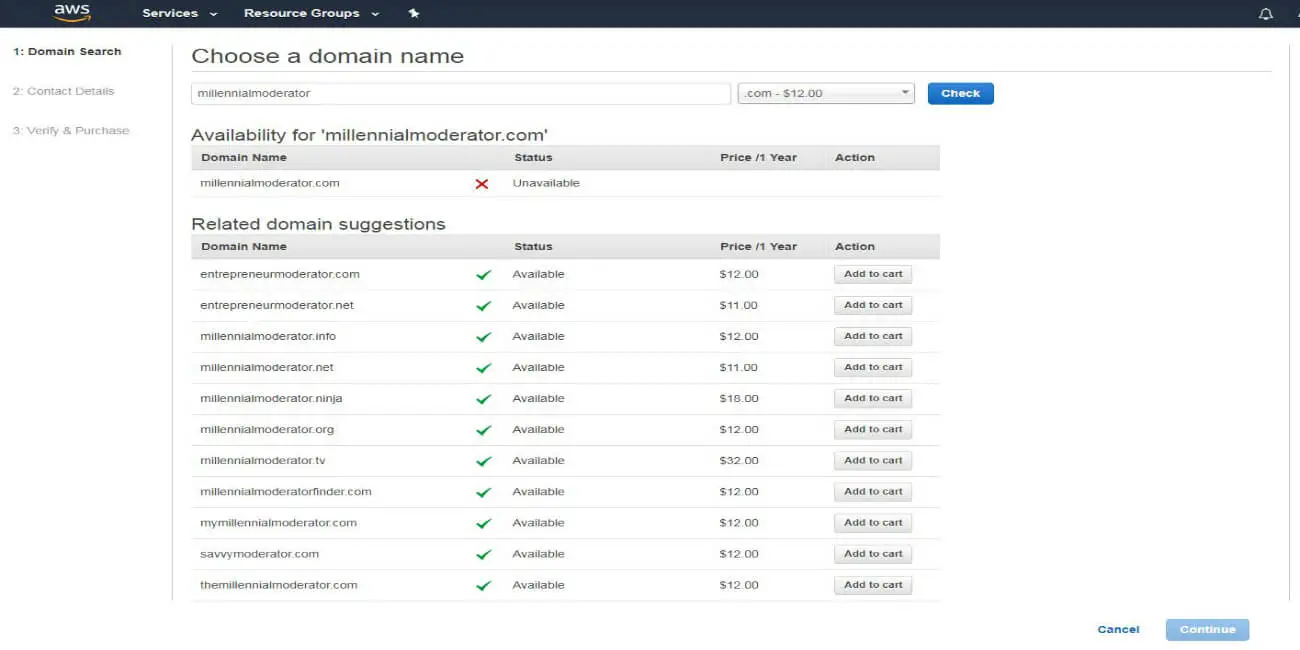
2. Register your domain of choice
Log into your AWS business relationship and navigate to the Route 53 service. You can search for Route 53 by selecting 'services' in the summit left corner of the dashboard. This is where y'all will become through the process of registering a domain. Start past searching for the domain you desire to use and, if it comes up as available, go along through the purchasing details and complete the purchase. This domain is registered on a yearly footing, so the $12.00 y'all spend today will exist practiced for the residual of the twelvemonth and the renewed on the same date next twelvemonth.
3. Set up an AWS S3 saucepan
At present that you accept your domain purchased, we volition need to set up up the S3 saucepan where the actual website content (HTML, CSS, JS) will alive. Navigate to the S3 service console past clicking 'services' at the superlative left corner of your AWS dashboard. One time the S3 console loads, click the 'create bucket' push button and proper name it after the total domain of your website. For instance if my domain is millennialmoderator.com, I would name my saucepan exactly that aforementioned thing- millennialmoderator.com. Continue through the other options and terminate by clicking the 'create saucepan' button at the end. Since nosotros are building a static website, this bucket acts as the directory for all of your sites contents. If you're already feeling lost and are ultimately looking for a technical partner to aid, here are some tips to continue your developer costs low.
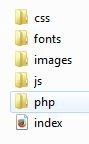
4. Upload your static website directory
Now that you have a domain and a identify to store your website data, the adjacent step is to create and make full your website with content! If you've never written HTML or CSS, this volition be a learning opportunity for you, so I suggest checking out this getting stated Modern I wrote, it will help betoken you in the right management. Y'all tin besides download HTML website templates from various websites similar this one, just be sure to avoid plagiarism. The important affair is that your static website directory needs to cease upwards look something like the image below. All a website actually is, is a collection of files organized in folders.
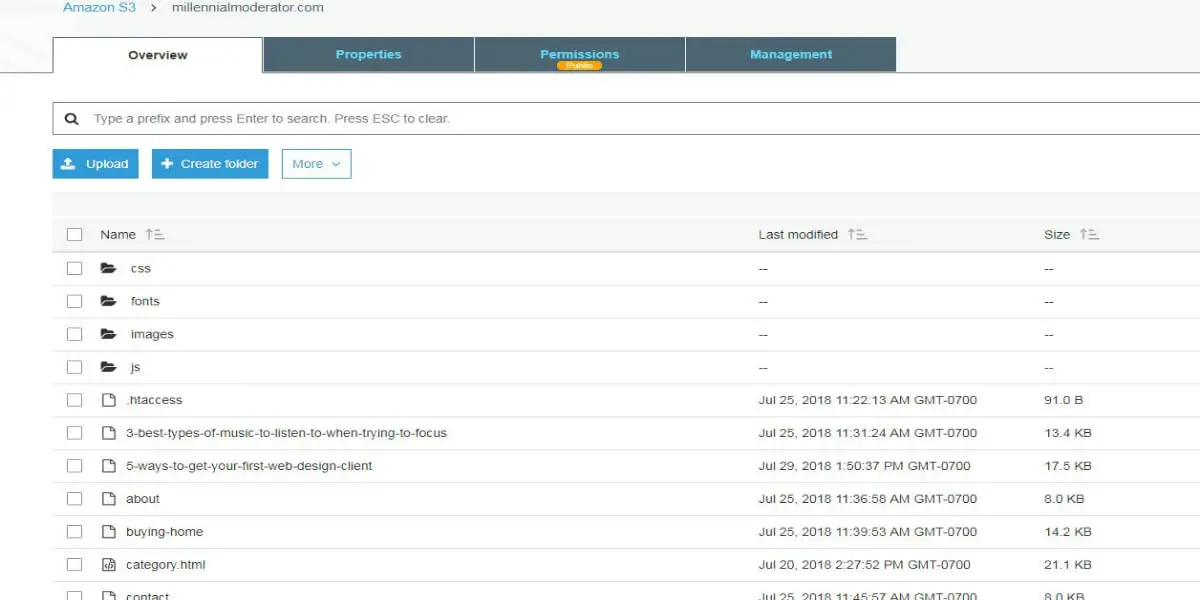
Select your S3 saucepan from the AWS console and upload your website directory (all the folders/files) direct into the saucepan. AWS volition display a pop-up of all the files you're uploading, to confirm. Choose 'upload' at the bottom of that window. At present, you should see all of your files within the S3 saucepan of your domain proper name like the image below.
five. Update your bucket permissions
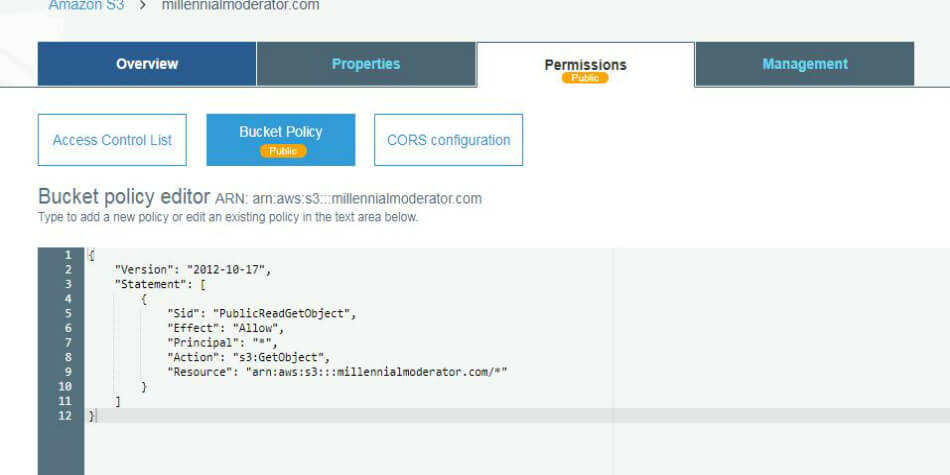
In your S3 saucepan, select the permissions tab about the acme. Here, click the 'saucepan policy' box and copy paste the post-obit code. This lawmaking allows the bucket to be read by everyone- after all nosotros want people to be able to view your static website!
Note: change the 'yourdomainname.com' from the to a higher place snippet to fit the exact name of your bucket, which should also be your domain equally nosotros fix in stride three (millennialmoderator.com). You lot will get a warning bulletin that your bucket is now public- this is expected. See last result epitome below:
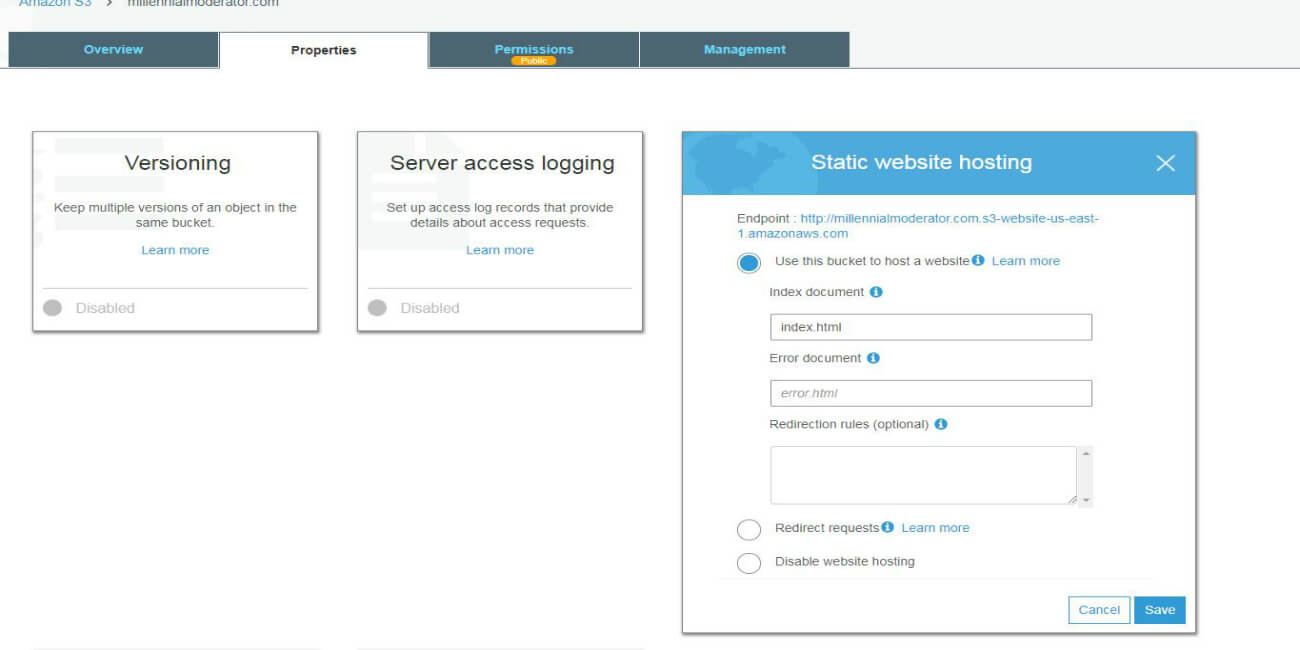
6. Configure your bucket for static website hosting
At present that we've been able to upload your website files and make the directory public, nosotros need to configure the bucket to respond to your domain. Select the backdrop tab near the top of your S3 bucket settings. So select the box that reads 'static web hosting' and input the proper noun of the index file that you uploaded in stride four. This index file is the HTML of your website and will most commonly be your dwelling page. Most people phone call this page 'index' or 'abode', but you tin call it whatever you lot similar. If you lot're not happy with the design of your website, there are tons of great graphic and web designers like this one that can assistance spark some ideas! At present click save. At present when you click on the static webhosting box once more, you will see an endpoint link. Click on that and y'all should now run into what your website looks similar on the web!
- Notation: if you become any sort of fault, double check that the index document has no typos in it, as this is where the bucket will begin loading your webpage. Likewise if the layout of your website is not how you intended (divs all over the place, etc), you will demand to go into the html/css documents using a code editor (or just notepad works) and make necessary adjustments there, then reupload to your S3 bucket.
- Extra: I suggest as well opening a second saucepan and naming it "www.yourdomainname.com", then that if someone searches for your website with the world wide web portion, information technology volition go redirected to the correct identify. Get to this newly created bucket, select the properties tab > static spider web hosting > redirect requests and blazon the proper name of the showtime bucket you created: youdomainname.com.
seven. Update your static website DNS
Now we take to point your domain to the bucket, so that when people practise a Google search, it goes to the right place. Navigate dorsum to the Route 53 console (top left of dashboard - services) and select 'hosted zones' from the left side panel. Click on your domain name and select the button 'create record gear up' at the acme, which volition open a right side panel to configure DNS settings. This is where you will configure your domain to point to the saucepan where your website content lives. Details beneath:
- Get out the 'proper noun' department blank
- Exit 'type' the same- A-IPV4
- Alias, choose YES.
- In the Alias target, select the name of your s3 saucepan endpoint, it should be something like this: s3-website-us-east-ane.amazonaws.com.
- Go out the rest of the options every bit they are, and select 'save tape set'.
8. That's it!
Allow's summarize what all nosotros did hither. Nosotros started past registering our domain with AWS, then we set up an S3 bucket to act as the shell of our website. Nosotros then uploaded our entire website directory (all images, files, etc) to the bucket and fabricated information technology public and then people can see what we've got. Then we configured our bucket to act as a static website, followed by updating our DNS so that when someone does a Google search for 'millennialmoderator.com' and clicks the name, it actually opens up our website! It might accept a few minutes for the DNS changes to populate (upwardly to 24 hours in some cases), but you should very presently be able to type in your domain name into a web browser and voila- your static website appears. This is also how I built my ain personal portfolio!
Note: to monitor your AWS billing information, you will want to use the billing panel, which you can find my selecting your name at the top right of your AWS dashboard and selecting 'billing dashboard'. Following these instructions exactly, y'all should be paying at almost, a few cents each calendar month for the website. Of course every bit traffic increases, these costs might go upward. You can too check countrywise website hosting comparisons at Mango Matter Media. :)
If you found this Mod informative and helpful, please consider sharing it using the social media icons below. Any comments or questions? Let usa know on Twitter!

Aleksey Weyman
Aleksey Weyman is a web designer, music artist and creator of Millennial Moderator
beasleywhissilther1936.blogspot.com
Source: https://millennialmoderator.com/website-hosting-on-s3-tutorial-low-cost
0 Response to "Wix Upload an Image to an S3 Bucket"
Post a Comment